In this part you will connect a model running on your own machine to real tools, using LangChain's prebuilt create_agent, and watch it call those tools from the terminal. The whole thing is one file, agent.py, about a hundred lines including comments and the system prompt. I started this project knowing almost nothing about LangChain or LangGraph, so I began with the smallest thing that could work, then spent the rest of the series replacing the parts it hides.
Prerequisites: Python (I used 3.14), uv, and LM Studio with a tool-calling model loaded. Start from the series overview if you want the map.
langchain 1.4.10, langgraph 1.2.20, langchain-openai 1.7.4, langchain-mcp-adapters 0.3.2, mcp 1.30.0, Python 3.14.0, model qwen2.5-7b-instruct-mlx in LM Studio.
The three pieces
An agent here is three things talking to each other:
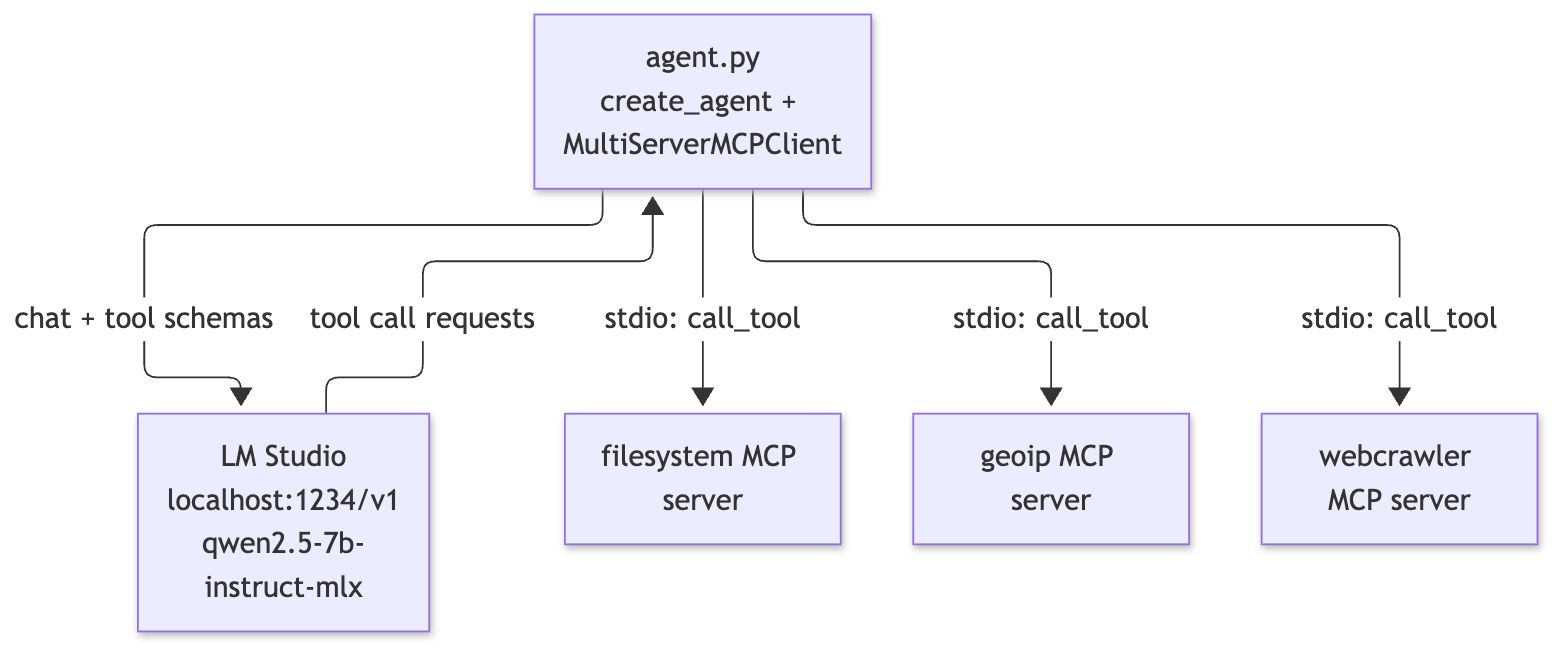
The model never touches a file or a network. It only reads text and, when it wants something done, emits a structured request such as "call list_dir with this path". The agent loop in agent.py runs that tool, feeds the result back as another message, and asks the model again. It stops when the model answers without asking for a tool.
Set up
Create the project and add the libraries. langchain is needed for create_agent (more on that below).
uv init langgraph-starter && cd langgraph-starter
uv add langchain langchain-openai langchain-mcp-adapters langgraph mcp
In LM Studio, load a model that supports tool calling, turn on the local server, and check that it answers:
curl localhost:1234/v1/models
You should get JSON listing the loaded model ids, including qwen2.5-7b-instruct-mlx in my case. If that call fails, nothing else in this series will work, so fix it first.
Talking to a local model
LM Studio exposes an OpenAI-compatible HTTP API. That means LangChain's ChatOpenAI class can talk to it if you point it at the right address:
agent.py · llm
llm = ChatOpenAI(
    base_url="http://localhost:1234/v1",
    api_key="lm-studio",  # LM Studio ignores the value but the client requires one
    model="qwen2.5-7b-instruct-mlx",
    temperature=0,
)
The api_key is a placeholder. The OpenAI client library refuses to start without one, but a local server has no accounts, so LM Studio accepts whatever string you send. Nothing here leaves your machine and no real key is involved. temperature=0 asks for the most repeatable output the model can give, which matters when you are debugging prompts. It does not make a small model correct, only more consistent.
What MCP is, in a few sentences
The Model Context Protocol (MCP) is a standard way for a program to offer tools to an LLM application. A server lists its tools, each with a name, a description and a JSON schema for its arguments, and runs them when asked. A client connects, reads the list, and forwards calls. With the stdio transport the client simply launches the server as a child process and talks to it over stdin and stdout.
I use three of my own servers: a file system server (27 tools), an IP geolocation server (5) and a web crawler (7). They are not part of this series; any stdio MCP server can take their place, and the series refers to them only by the tools they expose.
Turning servers into LangChain tools
MultiServerMCPClient from langchain-mcp-adapters takes a dictionary of server configs, launches each one, asks it for its tools, and wraps every MCP tool as a LangChain tool the agent can call. The config is where the fiddly part lives:
agent.py · MCP_ROOT, _server, MCP_SERVERS
# Folder holding the sibling MCP servers (FileSystem/, GeoIP/, Webcrawler/). Defaults to this
# project's parent directory; set MCP_ROOT to override.
MCP_ROOT = Path(os.environ.get("MCP_ROOT", Path(__file__).resolve().parent.parent))

QUIET = str(
    Path(__file__).parent / "quiet_server.py"
)  # silences the servers' INFO logs


def _server(python: str, script: str, cwd: str | None = None) -> dict:
    cfg = {"command": python, "args": [QUIET, script], "transport": "stdio"}
    return {**cfg, "cwd": cwd} if cwd else cfg


MCP_SERVERS = {
    "filesystem": _server(sys.executable, f"{MCP_ROOT}/FileSystem/filesystem_mcp.py"),
    # These two have their own venvs with their own dependencies, so use those pythons.
    "geoip": _server(
        f"{MCP_ROOT}/GeoIP/venv/bin/python",
        f"{MCP_ROOT}/GeoIP/GeoIP-MCP.py",
        f"{MCP_ROOT}/GeoIP",
    ),
    "webcrawler": _server(
        f"{MCP_ROOT}/Webcrawler/venv/bin/python",
        f"{MCP_ROOT}/Webcrawler/basicSeleniumCrawlMCP.py",
        f"{MCP_ROOT}/Webcrawler",
    ),
}
A few things are worth spelling out:
MCP_ROOTis the folder that holds the three server folders. It defaults to this project's parent directory and can be overridden with an environment variable, so no absolute path is hard-coded._serverbuilds one config entry. For stdio, a config is "run this command with these arguments". The command is a Python interpreter, and the arguments are a wrapper script (QUIET, which I cover in Part 8) followed by the server script it should run.- The per-server venv python. The file system server runs fine under this project's own interpreter (
sys.executable). The other two have their own virtual environments with their own dependencies, so I launch them with those environments'python. Using this project's interpreter for them would fail on missing imports. cwd. Those two servers are started from their own folder, so_serverpasses a working directory when one is given.
Picking which tools the model sees
client.get_tools() returns every tool from every server, 39 in my case. I do not hand all of them to the model:
agent.py · select_tools
def select_tools(tools: list, extra: frozenset | set = frozenset()) -> list:
    return [t for t in tools if t.name in ALLOWED_TOOLS | extra]
ALLOWED_TOOLS is a curated read-only set of 19 names. It keeps write tools and command execution away from this one-shot agent, and it keeps the tool list short for a small model. Part 2 is about why.
The agent itself
agent.py · main
async def main(prompt: str) -> None:
    client = MultiServerMCPClient(MCP_SERVERS)
    tools = select_tools(await client.get_tools())
    print(f"Using {len(tools)} tools\n")

    agent = create_agent(llm, tools, system_prompt=SYSTEM_PROMPT)
    await run(agent, prompt)
create_agent(llm, tools, system_prompt=...) returns a LangGraph graph that implements the loop described earlier: call the model, run any tools it asked for, call the model again, repeat. You do not write the loop. That is the point of a prebuilt agent, and also the thing Part 3 opens up. run comes from display.py; it streams the graph and prints one line per step, which is what you see in the transcript below.
Symptom: my first version imported create_react_agent from langgraph.prebuilt. It worked, but printed a deprecation warning saying create_react_agent has been moved to langchain.agents.
Cause: the prebuilt agent had moved to the langchain package under a new name.
Fix: uv add langchain, then from langchain.agents import create_agent. One argument also changed name: the system prompt went from prompt= to system_prompt=. If you copy older tutorials, expect this mismatch.
Run it
One run, with the system prompt from the file (I explain it in Part 2). My home directory is shown as ~:
$ uv run python agent.py "Is 8.8.8.8 a valid IP address?"
Using 19 tools

  → validate_ip(ip_address='8.8.8.8')
  ← { "ip_address": "8.8.8.8", "valid_format": true, "is_public": true, "classification": "public" }

The IP address 8.8.8.8 is valid and it is a public (routable on the internet) IP address.
A second run, which touches the file system server:
$ uv run python agent.py "List the files in ~/langgraph-starter and tell me when the docs folder was last modified"
Using 19 tools

  → list_dir(path='~/langgraph-starter', glob='*.py')
  → stat(path='~/langgraph-starter/docs')
  ← { "entries": [ { "name": "agent.py", "path": "~/langgraph-starter/agent.py", "type": "file", "size": 3657, "modified": 1794365272.057 … (1033 chars)
  ← { "path": "~/langgraph-starter/docs", "type": "directory", "size": 96, "created": 1794365327.9784584, "modified": 1794365327.9784584, … (212 chars)

The files in ~/langgraph-starter are:
- agent.py (modified: 1794365272.057856)
- agent_graph.py (modified: 1794360393.7950819)
…
The docs folder was last modified at epoch seconds: 1794365327.9784584.
(I trimmed the file list. Model output varies between runs; this is one of them.)
Reading the output:
Using 19 toolsis printed bymainafter filtering.→ name(args)is a tool call the model requested.display.pydrops empty or default-looking arguments to keep the line short.← ...is the tool's result, collapsed to one line and cut at 160 characters, with the full length shown as… (N chars). A failed tool shows✗instead of←.- The unindented text at the end is the model's answer.
Two things in the second run are worth noticing already. The model added a glob='*.py' filter I never asked for, so its file list silently leaves out folders and non-Python files. And it ran two tools in a row before either result came back, even though the system prompt says to call one at a time. The model followed the format of tool calling perfectly and the spirit of my instructions only partly. That gap is the subject of the next part.
What this version hides
- The loop is inside
create_agent. You cannot see where the model decides to stop, or insert a step such as routing or approval. - There is no memory: every run starts empty.
- All 19 tools are in front of the model on every request, which is a lot for a 7B model.
- It is a one-shot script, not a conversation.
Recap
- LM Studio's OpenAI-compatible server lets
ChatOpenAItalk to a local model; theapi_keyis a required placeholder. MultiServerMCPClientlaunches stdio MCP servers and wraps their tools as LangChain tools;_serverhandles the command, wrapper script, per-server Python and working directory.select_toolsnarrows 39 tools to a curated 19 before the model sees them.create_agent(llm, tools, system_prompt=...)gives you the whole call-run-repeat loop in one line, replacing the deprecatedcreate_react_agent(andprompt=).- The printed
→and←lines are your first view into what the model actually does.
Next: Part 2